
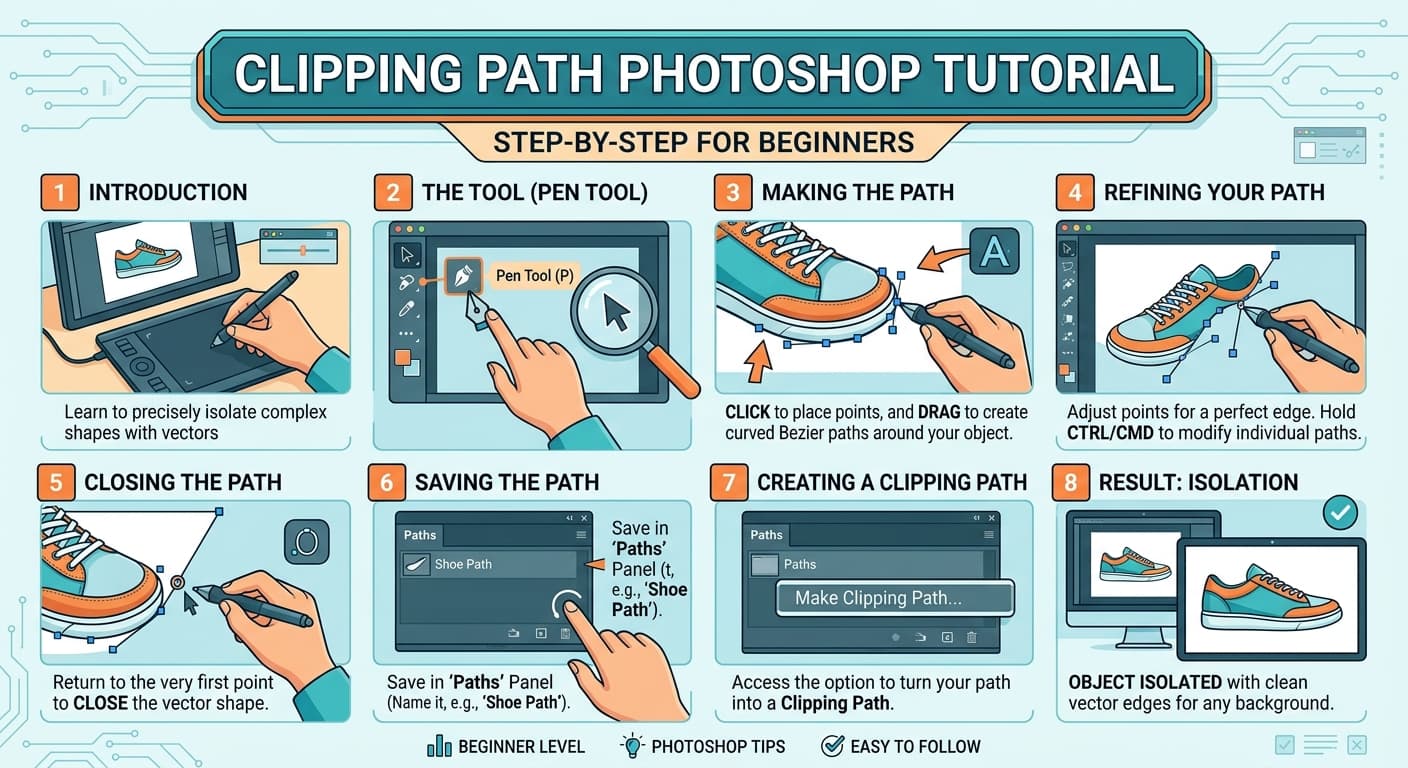
A clipping path in Photoshop is a hand-drawn vector outline used to perfectly cut an object out of its background. I learned to create them out of pure necessity when I was editing my first batch of e-commerce product shots, and let me tell you, the process was painful at first.
A clipping path in Photoshop is a hand-drawn vector outline used to perfectly cut an object out of its background. I learned to create them out of pure necessity when I was editing my first batch of e-commerce product shots, and let me tell you, the process was painful at first. But mastering this one skill will give you more control over your images than any automatic tool ever will.
Think of it like tracing with a super-powered digital stencil. It’s the single most precise way to isolate an object, and it’s a non-negotiable skill for anyone serious about professional photo editing.
What Is a Clipping Path, Exactly?
A clipping path is a closed vector shape, drawn with the Pen Tool, that defines the edges of an object you want to keep. Unlike pixel-based selection tools (like the Magic Wand or Quick Selection), a path isn't made of pixels. It’s a mathematical line that stays perfectly crisp no matter how much you zoom in or resize the image. Once the path is complete, you can use it to create a perfect selection or a mask, effectively making the background disappear without permanently deleting it.
Why a Clipping Path Beats Other Background Removal Tools
When I first started, I tried everything to avoid the Pen Tool. "Select Subject," Magic Wand, Quick Selection... you name it, I clicked it. Honestly, I think those automatic tools are a trap for beginners. They look great for five seconds, then you spend the next 20 minutes cleaning up all the wobbly edges and weird artifacts they left behind.
A manual clipping path is different. It’s work, yes, but the result is professional. It’s the difference between a cheap-looking cutout and something ready for a magazine cover.
Here’s a quick breakdown of how it stacks up against the common alternatives:
Tool How It Works Best For Biggest Flaw My Verdict Clipping Path Manual vector drawing Hard-edged objects Time-consuming The gold standard Magic Wand Selects similar-colored pixels Solid color backgrounds Terrible on complex images Use with extreme caution Quick Selection Finds edges algorithmically Well-defined objects Grabs parts of the background Better than Magic Wand, but still messy Select Subject AI-powered object detection Obvious subjects Wobbly edges, poor detail A good starting point, never the final step
The clear winner for quality is the hand-drawn path. The AI can get you 80% of the way there, maybe, but that last 20% is what separates amateur work from professional results.
The Pen Tool: Your Best Friend (Even When it Feels Like an Enemy)
Okay, let's be real. The Pen Tool (shortcut: P) has a reputation for being difficult. My first attempt to trace a simple coffee mug drove me nuts; it took me four tries just to get a shape that didn't look like a melted potato. The key is understanding its two main jobs: making corners and making curves.
- Anchor Points: These are the dots you place.
- Paths: The lines that connect the dots.
- Direction Lines (or "Handles"): These control the shape of your curves. This is where everyone gets stuck.
Think of it this way:
- To create a sharp corner: Just click.
- To create a smooth curve: Click and drag. The direction you drag the handles determines the shape of the curve.
It takes practice. Don't expect to master it in ten minutes. I gave up for a week after my first failed session. But stick with it, because once it clicks, it clicks.
Step-by-Step: Creating Your First Clipping Path in Photoshop
Ready to try it? Let’s trace a simple object. Grab a picture of a book, a box, or a piece of fruit—anything with clear, hard edges.
Step 1: Set Up Your Workspace
First things first. Select the Pen Tool (P) from your toolbar.
Now look at the options bar at the top of the screen. Make sure the dropdown menu is set to "Path," not "Shape." This is the single biggest mistake people make. If it’s set to "Shape," it will try to create a new colored shape layer, which is not what we want.
My personal ritual: I always zoom way in. I'm talking 200% or even 300%. You can't draw an accurate path if you're looking at the whole image from a distance.
Step 2: Placing Your First Anchor Point
Find a clean corner or a straight edge on your object to start. Click once to place your first anchor point. That's it. You've begun.
Step 3: Drawing Straight Lines
For any straight sections of your object, this part is easy. Just move your mouse to the next corner and click again. Photoshop will connect the dots with a perfectly straight line. Continue clicking at each corner along the straight edges.
Step 4: Tackling Curves (The Hard Part)
Here we go. When you get to a curve, click at the beginning of the curve and drag your mouse in the direction the curve is heading. You'll see two "handles" (the Direction Lines) appear. The length and angle of these handles control the bend.
Place your next point at the end of the curve, then click and drag again to complete the curved segment.
Pro-Tip: To change direction sharply (like going from a curve into a corner), hold down Alt (or Option on a Mac) and click on your last anchor point. This "breaks" the handle, allowing you to move in any new direction without a weird, loopy curve. This one tip saved me hours of frustration. My handles kept going wild before I figured this out.
Step 5: Closing and Saving the Path
Work your way all around the object until you're back at the beginning. Hover your cursor over your very first anchor point. You’ll see a small circle appear next to the Pen Tool icon. Click it. This closes the path, creating a complete outline.
Do not skip this part! Go to your Paths panel (if you don't see it, go to Window > Paths). You'll see a "Work Path." This is temporary! If you click off it or start a new path, you'll lose it. I can't tell you how many times I forgot to save my path and had to start all over.
Double-click on "Work Path" and give it a name like "Product Outline." Now it's safely saved within your Photoshop file.
Turning Your Path into a Selection or Mask
You have a path. Now what? You have two great options.
Method 1: Making a Selection
In the Paths panel, right-click on your named path and choose "Make Selection...". A dialog box will pop up.
This is where you set the "Feather Radius." Feathering softens the edge of the selection slightly so it doesn't look too harsh. My personal habit is to always use a 0.5 pixel feather. It's just enough to make the edge look natural without being blurry. For most product photos, 0.3px to 0.5px is the sweet spot.
Once you click OK, you’ll see the "marching ants" of a selection. From here, you can hit Cmd/Ctrl + J to put the object on a new layer, or click the "Add Layer Mask" button at the bottom of the Layers panel.
Method 2: The Vector Mask (My Preferred Way)
This is faster and gives you more flexibility. Make sure your object layer is selected in the Layers panel and your path is active in the Paths panel. Now, just hold Cmd/Ctrl and click the "Add Layer Mask" button.
Instead of a pixel mask, Photoshop creates a vector mask using your path. It looks the same, but it's infinitely editable. You can grab the Direct Selection Tool (A) and tweak the anchor points of your mask at any time without having to redraw anything. It's clean and non-destructive.
When NOT to Use a Clipping Path
A clipping path in Photoshop is a specialist's tool. It's the wrong choice for certain jobs. Don't even try using it for:
- Hair or fur
- Fuzzy blankets or soft-edged clothing
- Trees and foliage
- Transparent or semi-transparent objects (like glass or smoke)
For those, you need more advanced techniques like channel masking, which is a whole other topic. If an object has both hard and soft edges, you might need a combination of techniques, or even to create a multi clipping path to isolate different components. Some complex photo retouching jobs require both paths for the hard surfaces and masks for the softer details.
The Part Nobody Tells You
So, is learning this skill worth the headache? Absolutely. It’s a foundational skill that separates experienced designers from beginners.
If you’re doing e-commerce work, product photography, or any kind of graphic design that involves combining images, you need to know this. It gives you ultimate control and a professional finish that no AI button can replicate. But if you’re a portrait photographer dealing with lots of flyaway hair or a blogger on a tight deadline with hundreds of images, your time might be better spent on other techniques or even outsourcing the work.
Ultimately, mastering the clipping path Photoshop technique is about investing in your own skills. Push through the initial frustration, practice on simple shapes, and soon you'll find the Pen Tool is one of the most powerful and reliable tools you have.
Frequently Ask Question
What is a clipping path?
A clipping path is a precise vector outline drawn in a program like Photoshop, used to cut an object out from its background.
What tool is used for clipping path in Photoshop?
The Pen Tool (P) is the primary, professional tool used for creating a manual clipping path in Photoshop.
Is a clipping path the same as background removal?
A clipping path is a technique used for background removal. It's one of the best methods for isolating objects with hard edges.
Why is a clipping path better than the magic wand?
It provides superior precision with vector points for perfectly clean edges, which pixel-based tools like the Magic Wand can't achieve.
How long does it take to create a clipping path?
It varies widely, from a couple of minutes for a simple phone case to over an hour for a very complex image like a bicycle.
Can you automate a clipping path?
No, a true, high-quality clipping path is always drawn by hand. Automated tools exist, but they don't offer the same level of accuracy.